

ArduinoPixel

وصف لـArduinoPixel
Control your NeoPixel LED strip from your phone or tablet.
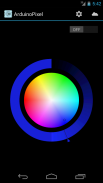
Change the strip's color, continuously, and in real-time... turn it on and off... all, from the convenience of your Android device.
Getting started is really easy:
* Take an Arduino Ethernet and a NeoPixel LED strip.
* Upload the provided code on the Arduino, https://codebender.cc/sketch:31742. (Read the comments for instructions.)
* Connect the Arduino to your local network.
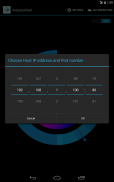
* Install the app, go to settings and specify the network parameters for your Arduino Web Server. If you see the "Hello from Arduino Server" message, then you know the setup is correct.
That's it! Enjoy
--------------------------------------------------------------------------------
Update:
I developed ArduinoPixel for personal use, but then I decided to share it. The app offers only those features I needed at that moment, realizing though that NeoPixels can do much more interesting things than simply light up. By now, enough people have used the app and responded with some positive feedback and ideas that I wanted to do something about it. In the near future, I intend to start working on the app again. If you have any requests and features you'd like to see implemented, please send me an email and tell me about them. I'll make sure to take your input into account.
Some ideas I have in mind about the project/app:
* Develop a web interface to allow the use from a web browser
* Set the turn on/off times of the strip in order to operate autonomously
* Allow the use of multiple strips
* Set two colors and a period of time, so that the strip can gradually cycle between them
* Add support for the $3 ESP8266 WiFi enabled boards
</div> <div jsname="WJz9Hc" style="display:none">سيطرة الصمام الخاص NeoPixel قطاع من الهاتف أو الكمبيوتر اللوحي.
تغيير اللون لقطاع غزة، بشكل مستمر، وفي الوقت الحقيقي ... تشغيله وإيقاف ... كل شيء، من الراحة من جهاز الروبوت الخاص بك.
بدء من السهل حقا:
* خذ إيثرنت اردوينو وNeoPixel ادى الشريط.
* تحميل الشفرة الموجودة على اردوينو، https://codebender.cc/sketch:31742. (قراءة التعليقات حصول على التعليمات.)
* قم بتوصيل اردوينو إلى الشبكة المحلية الخاصة بك.
* تثبيت التطبيق، انتقل إلى إعدادات ثم تحديد المعلمات شبكة لخادم الويب الخاص بك اردوينو. إذا كنت ترى رسالة "مرحبا من اردوينو خادم"، ثم تعرف الإعداد هو الصحيح.
هذا كل شيء! استمتع
-------------------------------------------------- ------------------------------
تحديث:
أنا وضعت ArduinoPixel للاستخدام الشخصي، ولكن بعد ذلك قررت أن تشاركه. التطبيق يقدم سوى تلك الميزات أنا في حاجة في تلك اللحظة، على الرغم من أن تحقيق NeoPixels يمكن أن تفعل أشياء أكثر إثارة للاهتمام بكثير من الضوء ببساطة. الآن، وقد استخدم عدد كاف من الناس في التطبيق وورد مع بعض ردود الفعل والأفكار الإيجابية التي أردت أن تفعل شيئا حيال ذلك. في المستقبل القريب، أعتزم بدء العمل على التطبيق مرة أخرى. إذا كان لديك أي طلبات والميزات التي ترغب في الاطلاع على تنفيذها، من فضلك أرسل لي رسالة بالبريد الالكتروني وتقول لي عنهم. سوف نتأكد من أن تأخذ المدخلات الخاصة بك في الاعتبار.
بعض الأفكار في ذهني حول المشروع / التطبيق:
* تطوير واجهة ويب للسماح باستخدام من مستعرض ويب
* تعيين بدوره على / قبالة مرات من الشريط لكي تعمل بشكل مستقل
* السماح باستخدام شرائط متعددة
* تعيين اثنين من الألوان وفترة من الزمن، حتى يتسنى للقطاع يمكن تدريجيا دورة بينهما
* إضافة دعم ل $ $ 3 ESP8266 واي فاي تمكين المجالس</div> <div class="show-more-end">


